


Kubernetes made easy: Develop and deploy on a cloud cluster
Part 2: Kubernetes
| Table of Contents |
|
Part 1: Basis
Part 2: Kubernetes Part 3: Ingress Controller Part 4: Design & Conclusions |
Kubernetes: Deploying on a cloud cluster
So far we only ran those commands locally. You could set up a dedicated server with a single Nginx reverse-proxying to various running web service and it'd already allow you to deploy exactly what you tested locally on any machine rapidly and manage the software stack. Let's see how we can deploy them on a set of machines in the cloud so that we have high availability and scalability.
Kubernetes can initially be quite daunting but especially since version 1.2 (and later) it's actually not that hard once you've got familiar with Docker. Installing it properly isn't trivial so we'll make use of Google Container Engine (GKE). You'll have to create an account and set up billing. The good news is that there is now a free tier. Also to get an idea of the actual cost if you want a beefier config, see a standard small cluster would cost about $ 70 / month):
- Go to Container Engine on Google Cloud
- Click "Create container cluster" button from withing "Container clusters" section and use any machine spec you seem fit
Congratulation you're now running one or more machines all set up for Kubernetes along with a private Docker Registry. A Docker Registry is a place where you can push/pull Docker images so that other people or machines can use them (this one is private so that you, people and machines you've authorized may access it).
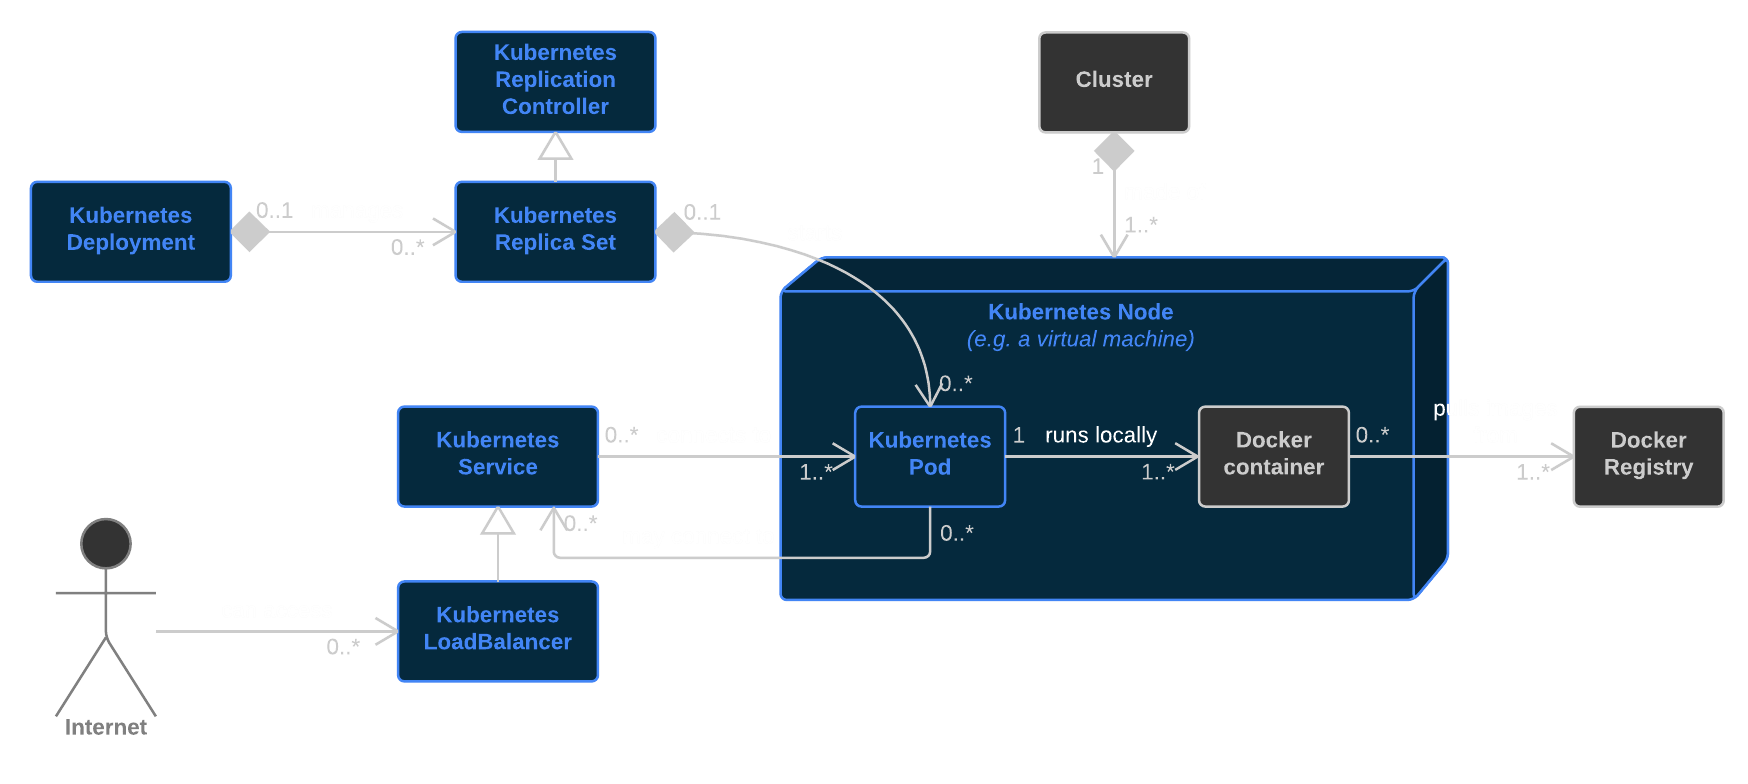
Overview of Kuberentes work units
Example code
kubernetes.yml
apiVersion: v1
kind: List
items:
  - apiVersion: v1
    kind: Service
    metadata:
      name: frontend
    spec:
      type: LoadBalancer
      loadBalancerIP: 10.10.10.10
      ports:
        - port: 80
      selector:
        name: frontend-pod
  - apiVersion: extensions/v1beta1
    kind: Deployment
    metadata:
      name: frontend-deployment
    spec:
      replicas: 2
      revisionHistoryLimit: 3  # Clean-up old Replica Sets deployed; only keep previous 3.
      # Pod template (contains same fields as a normal Pod)
      template:
        metadata:
          labels:
            name: frontend-pod
        spec:
          containers:
            - name: nginx
              image: eu.gcr.io/my-google-cloud-project-id/my-frontend-image:v1
              ports:
                - containerPort: 80
  - apiVersion: v1
    kind: Service
    metadata:
      name: db
    spec:
      ports:
        - port: 3306
      selector:
        name: mysql-pod
  - apiVersion: extensions/v1beta1
    kind: Deployment
    metadata:
      name: mysql-deployment
    spec:
      strategy:
        # We need to kill the existing Pod before creating an new one
        # for the new one to be able to attach the persistent disk.
        type: Recreate
      replicas: 1
      revisionHistoryLimit: 3
      # Pod template (contains same fields as a normal Pod)
      template:
        metadata:
          labels:
            name: mysql-pod
        spec:
          containers:
            - name: mysql
              image: mysql:5.7.8
              env:
                - name: MYSQL_RANDOM_ROOT_PASSWORD
                  value: 'yes'
              ports:
                - containerPort: 3306
              volumeMounts:
                - name: mysql-persistent-storage
                  mountPath: /var/lib/mysql
          volumes:
            - name: mysql-persistent-storage
              gcePersistentDisk:
                pdName: my-database-disk
                fsType: ext4
Note: Instead of using --- to have the equivalent of multiple Yaml in a single file, we use kind: List which allows to use Yaml features accross the entire file.
It may look like a lot but it's not that complex; let's break it down:
- We have two Kubernetes Deployments which is a way to ask Kubernetes to start containers that are expected to continuously execute. In Kubernetes, Docker containers run inside Pods which is a logical machine (may or not be a phyiscal machine): You’ll want to group your containers that need to be collocated by having them on the same Pod (a logical host), so they’d share:
- Volumes (i.e. hard disk)
- Network namespace (i.e. can connect via localhost)
- Memory
- We have two Kubernetes Services; they allow to connect from one or more Pods to a given set of Pods (matching labels). For example here, from within a Docker container running on your Kubernetes cluster, the host
dbwill point to the Podmysql-podon which runs the MySQL container; any its port 3306 will be accessible. Also we're running two Nginx possibly on two machines, but you can access any of them that is up and running by accessing the hostfrontend. ThatfrontendService is a LoadBalancer: It'll create an external IP that resolves the service. This will be the only way to access your containers from the public internet (i.e. outside your cluster). - Last but not least, we have asked to mount a persistent disk which will allow us to persist the database even after upgrading. Google Compute Engine Disks (GCD) are encrypted by default and they are backed up and costs about $0.4 for 10 GB each month.
We need to create that disk before we can use it:
- Go to Developers Console > Compute > Compute Engine > Disk
- Click on "Create disk":
- Name:
my-database-disk - Zone: Same zone as your Kubernetes cluster
- Disk Type: Any
- Source type: None (blank disk)
- Size: Whatever your need
- Name:
We also need to have a static IP so that we can set up DNS provider and have our domain point to it:
- Go to Developers Console > Networking > External IP addresses
- Click on "Reserve static address":
- Name: Any
- Type: Regional
- Region: Same zone as your Kubernetes cluster
- Attach to: None
Now note that assigned External Address and replace 10.10.10.10 above by that assigned IP.
Let's deploy everything (after installing kubectl, Kubernetes's client, and gcloud, Google Cloud's client):
curl -L https://sdk.cloud.google.com | bash
gcloud components update kubectl
gcloud auth login
gcloud config set project my-google-cloud-project-id
gcloud container clusters get-credentials cluster-name

docker tag my-frontend-image eu.gcr.io/my-google-cloud-project-id/my-frontend-image:v1
gcloud docker -- push eu.gcr.io/my-google-cloud-project-id/my-frontend-image:v1
kubectl apply -f kubernetes.yml
Checking deployment status
Most commands return immediately, you'll have to check deployment status yourself, example:
kubectl get deployment,pods,services
NAME                             DESIRED          CURRENT           UP-TO-DATE          AVAILABLE   AGE
frontend-deployment              2                2                 2                   2           3m
mysql-deployment                 1                1                 1                   1           3m
NAME                                        READY            STATUS            RESTARTS            AGE
frontend-deployment-0000000000-00001        1/1              Running           0                   3m
frontend-deployment-0000000000-00002        1/1              Running           0                   3m
mysql-deployment-0000000000-00001           1/1              Running           0                   3m
NAME                             CLUSTER-IP       EXTERNAL-IP       PORT(S)             AGE
frontend                         10.100.200.10    10.10.10.10       80/TCP              3m
mysql                            10.100.200.20                3306/TCP            3m
kubectl describe pod frontend-deployment-0000000000-00001
...
kubectl logs frontend-deployment-0000000000-00001
...
kubectl logs -p frontend-deployment-0000000000-00001
...
Deploying upgrades
Let's say some time later we changed some files locally and want to deploy a new image:
- Replace in
kubernetes.ymlthe:v1tag by:v2(or anything else). - Then run:
docker-compose build --pull
docker tag my-frontend-image eu.gcr.io/my-google-cloud-project-id/my-frontend-image:v2
gcloud docker -- push eu.gcr.io/my-google-cloud-project-id/my-frontend-image:v2
kubectl apply -f kubernetes.yml
We covered the basis. Let's see some more importants features of Kubernetes.
Related